BuzzWord 4 Tutorial
Corner Lettering Made Easy
by Lisa Laufer
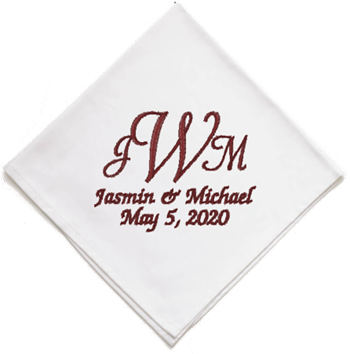
When working on a project that is sewn "on point" like a wedding napkin,
it can be difficult to layout your design in the
standard hoop position. Sure you can just angle all your text and work with your head tilted to the side but
rather than hurt your neck, try this method instead. You will be able to visualize your finished results
and at the same time you'll be creating basting stitches to hold down the
corner of your project.
Setting Up Your "On Point" Basting Boxes
- Start a new design in your preferred format using a 100 x 100mm hoop. If your workspace
doesn't show the hoop in the space work window, use the View > Show Hoop command to
display it.
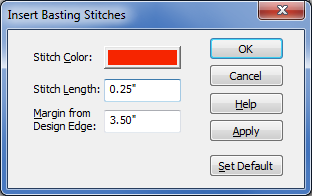
- Use BuzzTools > Insert Basting Stitches to open the
Basting Stitches dialog.
We'll be using this basting box to hold down the corner of our project. On the dialog, change the stitch length to
.25 and the Margin from Edge to 3.5" inches.
Click OK and the basting box is created.
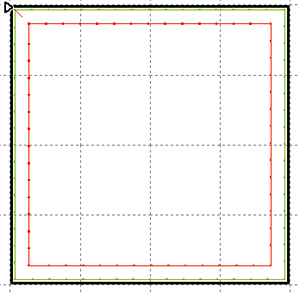
Note: Since our design contains no stitches, the basting box is created from the starting
position of the design which is the top left corner and can be created in any sized square.
- Use Ctrl + A to select all of the stitches in the basting box we just created and then use
Alt + C to center it in the hoop.
- Now, create a second basting box but this time set the size to 4". Use a different color thread from your
first basting box as we want the machine to stop between these two items. Because basting is done before
any other stitches, the basting box is added to the beginning of the design. Your workspace will now look
something like this:
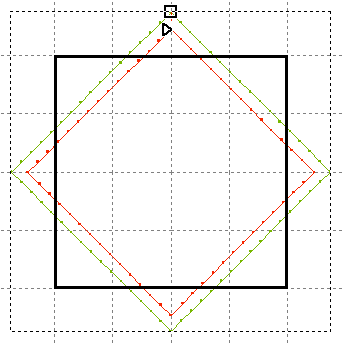
- Use Ctrl + A to again select all of the stitches and then use
BuzzTools > Rotate to bring up the rotate dialog and enter 45 in the degrees field. Click
OK and the
boxes are rotated on point making it easy for us to position our lettering. Now enter your lettering within
the basting box as you would like to see it on the corner of your napkin.
Note: If you do a lot of projects on point such as this napkin, you can save time
by saving this design as your go to template. Then when you open your new project, just insert your
on point template using the File > Insert Design... command.
Laying Out the Design
- Using the basting boxes as a corner guide, enter your text and optionally, insert other designs.
In the example, we used Box Text for the two lines of the monogram and
Point Text for the other two lines of text that contain the couples name and wedding date.
By using a separate text objects for each line, we have complete control over spacing and positioning.
See the Point, Straight Line and Box Text
tutorial for more information on how to create these types of text objects.
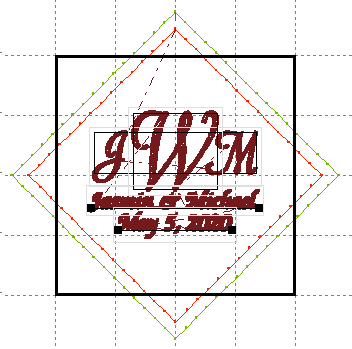
- Once your design is finished, save your design! You will get the "out of hoop" error but go ahead
and save it anyways. All of your design objects and information is saved in a .buz file for future editing.
Now create a second copy of the design using the File > Save As command and append either a
number to the end of the name or a comment such as "ready to sew".
- Press the escape key on your keyboard to make sure nothing is selected. Then use
BuzzTools > Rotate to bring up the rotate dialog. Enter 45 in the degrees field and change
the rotation to counter clockwise. Click
OK and the design is now within the hoop boundaries
and ready to sew.
At the Machine
- Hoop your stabilizer and mount it onto your embroidery machine. Stitch out the first basting box. Do
not hoop your napkin.
- Remove the hoop from the machine. Spray a light coat of temporary adhesive to the center of the basting
box. You may want to protect your hoop frame from over spray by covering it with strips of paper towel.
- Position the corner of the napkin along the basting box guidelines, being careful to position the corner
correctly to match the layout of the design.
- Attach the hoop back onto your machine and sew the rest of the design. The corner will be secured to the
stabilizer prior to sewing the rest of the design. So easy!


